Read the article below. Interactive reading tools are available when scripts load.
Classic
Saigō Takamori returned to Kagoshima after the government postponed his proposed Korea mission in 1873. His departure divided former Restoration colleagues. It did not immediately produce a rebellion: several years separated the council dispute from the armed march of 1877.
The abolition of domains, conscription, restrictions on sword wearing and changes to hereditary stipends had altered former samurai’s livelihoods and authority. Uprisings in Saga in 1874 and in several regions in 1876 preceded the Satsuma conflict. Their participants did not share one settled program.
In Kagoshima, private schools linked to Saigō’s followers provided military training and an organized network of young former samurai. Their influence extended into prefectural affairs. Central government measures to assert control therefore confronted an armed local organization with a prominent national leader.
Students attacked government arsenals in late January 1877 and seized weapons and ammunition. Saigō subsequently headed the force that marched north. The documented seizure and mobilization establish the transition to armed opposition; they do not establish that he had planned every preceding action.
Accounts of the immediate crisis connect the arsenal attacks to an attempted removal of ammunition from Kagoshima to the Kyoto–Osaka area. The private-school party interpreted this as preparation against them. A retrospective account also describes the interrogation of returning officials and students, after which allegations of a plan to kill Saigō circulated. That record establishes an accusation within the escalation, rather than proving a government assassination order or Saigō's private intentions. The movement's stated plan to question the government travelled north with an armed force.
Regional loyalty was not a single choice shared by everyone in former Satsuma. The government sent Kuroda Kiyotaka with an imperial envoy to ascertain the position of Shimazu Hisamitsu and Tadayoshi, and removed the prefectural governor Ōyama Tsunayoshi, who had supported Saigō's side. Former lords, prefectural officials, academy followers and central officers occupied different positions. The conflict divided a network that had helped establish the Restoration government; it was not simply Tokyo confronting an unchanged domain.
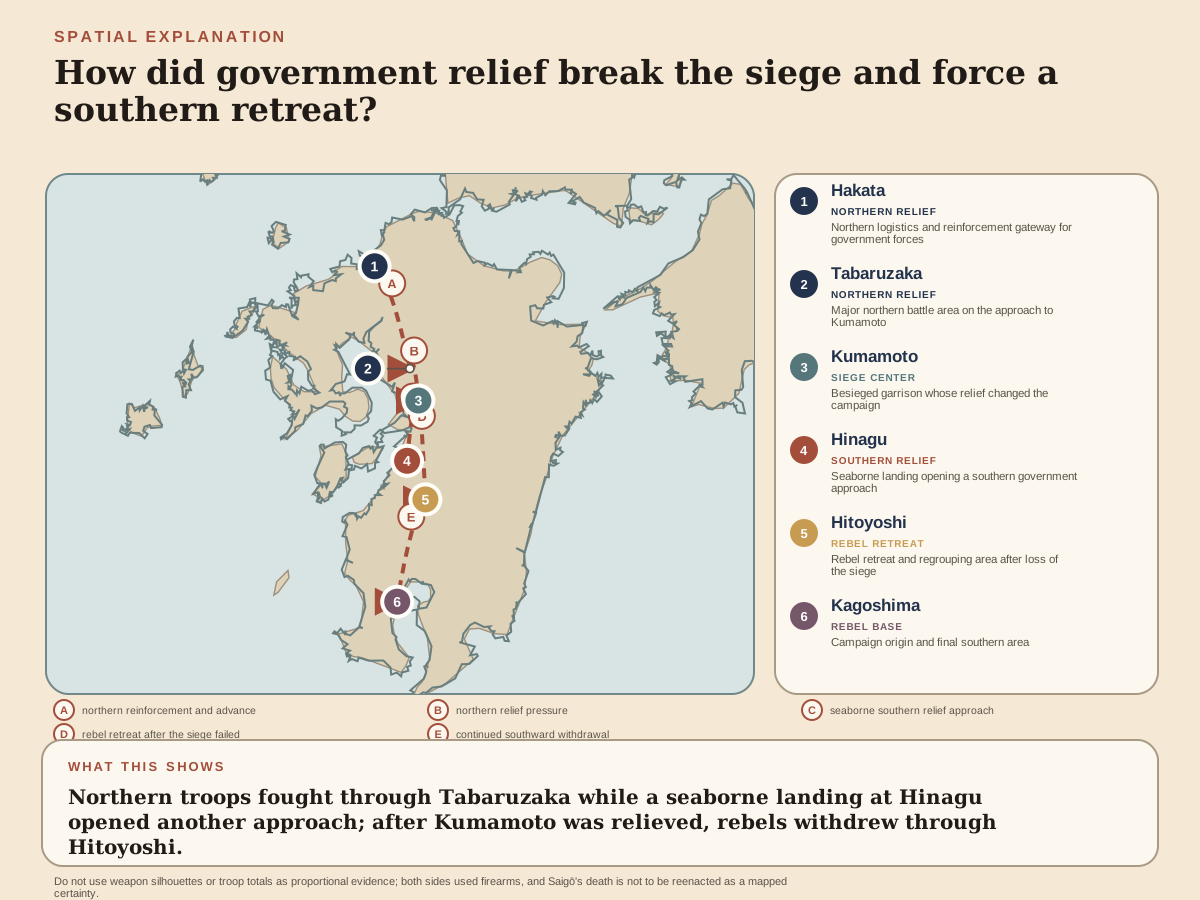
A rebel advance party left Kagoshima on February 14. The main campaign ran toward Kumamoto, whose castle contained a government garrison. Fire damaged the castle and surrounding town before the principal assaults on February 22–23. The attackers could not take the stronghold and continued a siege.
Government troops landed at Hakata on February 22 and advanced south. Rebel forces occupied approaches around Yamaga, Tabaruzaka and Kidome. The road through Tabaruzaka formed part of the route by which the northern relief force could reach Kumamoto; holding its approaches impeded that advance.
The battle there lasted from March 4 to 20. Rifles and artillery shaped the fighting on both sides. Government troops broke the defensive line, but this did not immediately end the siege: fighting continued around Kidome and other positions in April.
On March 19 a government brigade landed at Hinagu, south of Kumamoto, opening a second route of advance. The besiegers now faced pressure from different directions. On April 8, troops from the castle made a sortie to obtain food. Relief operations and the garrison’s continued resistance prevented the rebels from converting the siege into victory.
The siege ended on April 14. Fighting moved toward Hitoyoshi and then through southern and eastern Kyushu. Government forces could land troops by sea as well as move them along roads. Telegraph reports carried news from the fronts to Kyoto and Tokyo, connecting operations with the central leadership.
After defeat at Wadagoe on August 15, the rebels announced a dissolution of their army. A remaining group escaped through the government lines on August 18 and moved back toward Kagoshima. Saigō reached the city on September 1 and occupied Shiroyama. This return followed successive defeats and dispersal, rather than a direct retreat from Tabaruzaka to a final stand.
These routes made reinforcement a continuing operation. Troops approaching from Hakata had to break defenses north of the castle, while the Hinagu landing brought pressure from the south. The garrison still had to obtain food before relief ended the siege. Tabaruzaka's breakthrough was therefore one step within the reopening of approaches to Kumamoto, followed by further operations across Kyushu. The rebels' use of firearms did not remove their need to hold roads, obtain ammunition and replace men as the campaign lengthened.
Treatment of casualties formed another network along the fighting. Temporary hospitals and dressing stations occupied temples and other local buildings; graves marked losses beyond the castle and final battlefield. The government's telegrams conveyed reports to Kyoto and Tokyo, whereas medical facilities dealt with men whose participation had ended in wounds or illness. Transporting troops, transmitting a report and caring for a casualty were different tasks within the same prolonged campaign. The evidence for hospital locations does not license an invented scene of a particular household supplying or nursing either army.
Government troops surrounded Shiroyama and launched their final attack on September 24. Saigō was wounded and died; other surviving rebel leaders were killed or died in the fighting. Accounts preserve different details of his last moments, but the defeat and death ended his leadership of an organized army.
The government had held Kumamoto Castle, restored control of the campaign’s principal areas and defeated the largest of the early Meiji former-samurai uprisings. Neither the rebels’ earlier contribution to the Restoration nor their possession of firearms enabled them to overcome sustained government reinforcement.
The fighting left extensive physical losses. Burned urban property, field graves and temporary hospitals indicate consequences beyond commanders and celebrated battle positions. Hospitals and dressing stations operated in temples and other existing buildings, adapting local space to the treatment of wounded men.
Paying for the war also enlarged the money supply. The government increased its own note issuance and borrowed national-bank notes for expenditure. Inflation carried part of the war’s burden into ordinary transactions after combat had stopped, so military victory did not produce an immediate fiscal recovery.
Victory did not close the crisis among the founding leaders in one moment. Kido Takayoshi had died on May 26, while the war was still under way. Ōkubo Toshimichi was assassinated in Tokyo on May 14, 1878, amid hostility to the government's course. These deaths belong to the political aftermath and the loss of Restoration leaders, but neither makes illness, military defeat and assassination a single causal sequence.
Saigō's official rehabilitation was later still. His condemnation was lifted in the 1889 amnesty accompanying promulgation of the constitution, and he received a posthumous court rank. That decision changed his recognized standing after the government had defeated his army. It did not reverse the deaths, injury, destroyed property or wartime financial burdens recorded in the conflict, and it did not rehabilitate an independent regional force as an alternative government.
The defeat sharply reduced the prospect of overturning the central government through a large regional former-samurai army. Government troops could be replenished from a national system, while local armed organization had lost its strongest challenge. Political opposition continued through organizations, public speaking, petitions and the press.
The monetary consequences fed into a wider financial crisis. Matsukata Masayoshi’s retrenchment from 1881 sought to reduce inconvertible notes and stabilize finance; the Bank of Japan opened in 1882. These reforms addressed accumulated monetary problems, of which wartime financing was an important part.
Imperial Household documents also record relief visits and grants to bereaved families, while maps identify hospitals for both armies. Soldiers required care after battle, and surviving dependants faced the loss of family members. Mobilization continued into the administration of injury and bereavement.
At Shiroyama and Tabaruzaka, later monuments preserve selected meanings of the conflict. Physical evidence includes a recovered house pillar scarred by a projectile, interpreted by the museum as a possible trace of the fighting. The distinction between memorial interpretation and surviving material evidence matters because individual last words and heroic scenes are less securely documented than the campaign’s routes, institutions and destruction.
The institutional result was clearest in the continuing ability to mobilize. The center could send commanders and reinforcements, use coastal landings and receive reports from successive fronts. Financing that capacity through increased notes spread costs beyond Kyushu. The same account must therefore explain both why the government could continue the campaign and why households outside the fighting subsequently encountered inflation. A simple contrast between swords and modern guns explains neither.
Commemoration had begun before the official amnesty. Katsu Kaishū helped publish a collection remembering deceased friends and established a stone memorial for Saigō in 1879, using Saigō's earlier writing and his own remembrance. Mourning a former colleague could coexist with the state's condemnation. Later pardon and monuments brought the figure into a national commemorative setting, while field graves, hospital records and damaged buildings preserved other parts of the war. They should remain alongside Saigō's memorials because the campaign's human outcome cannot be represented by the reputation of its best-known defeated leader alone.