Read the article below. Interactive reading tools are available when scripts load.
Classic
After Shingen’s death in 1573, Katsuyori retained a substantial domain and continued campaigning against the Tokugawa. The capture of Takatenjin in 1574 demonstrated that Takeda forces could still take important positions in Tōtōmi.
Nagashino controlled a route from the mountains toward the Mikawa lowlands. The Okudaira had returned to Tokugawa allegiance, and Sadamasa, later Nobumasa, commanded the castle. Katsuyori’s siege in 1575 targeted that frontier position.
The castle’s waterways and elevated ground assisted defense, while Takeda positions on the opposing heights helped maintain the siege. Holding out allowed the garrison to await relief. Ieyasu requested Nobunaga’s military assistance.
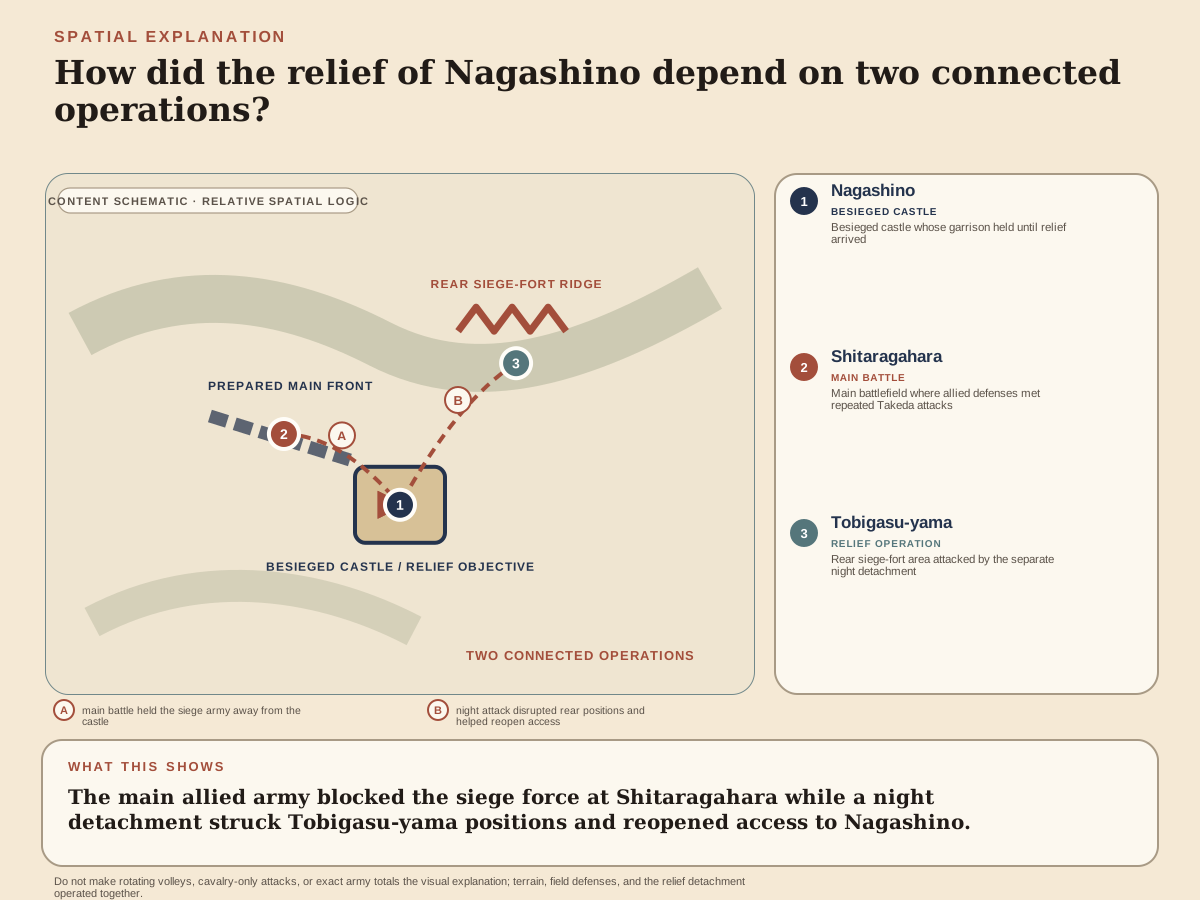
The relieving allies needed to confront Katsuyori while reopening access to the castle. Their larger army moved through Okazaki and established positions around Shitaragahara, west of the siege. The castle and the main battlefield became connected parts of one operation.
The siege and relief imposed different decisions. Katsuyori had to maintain troops around a castle while the relieving allies approached from the west. The garrison's continued resistance kept the castle available as an allied position; without it, the approaching army would have faced an occupied strongpoint. Messages and marching routes therefore connected defense to relief. The familiar Torii Suneemon story gives that connection a dramatic messenger, but its exact dialogue and execution scene require evidence beyond repeating a modern display.
Firearms were already part of Japanese warfare. The conventional Tanegashima introduction date, 1543, precedes Nagashino by more than thirty years, and guns had spread through domestic production. The Takeda army also included infantry and firearms alongside mounted men. The question at Nagashino was how troops, weapons and prepared ground were brought together under the pressure of a siege, rather than which side first encountered a gun.
Gyūichi follows Nobunaga’s movement through Okazaki and Ushikubo to the hills around Shitaragahara. The allied army used folds in the ground to deploy troops and installed palisades along parts of the front. Streams and slopes narrowed the attackers’ approaches.
Nobunaga assigned officers including Sassa Narimasa and Maeda Toshiie to supervise concentrated gunners. Firearms operated within a position occupied by other infantry and commanders. Their effect depended on where the defenders stood and how attackers entered the approaches.
A detachment under Sakai Tadatsugu moved overnight through the hills toward Tobigasu-yama. It included Tokugawa troops and Oda gunners. At dawn, the attackers drove off the siege forces, entered the castle and joined its defenders in attacking nearby positions.
The main Takeda force attacked the allied front on the twenty-first day of the fifth Japanese month. Gyūichi names successive contingents, including Yamagata’s and Baba’s, meeting gunfire and withdrawing. Fighting continued into the afternoon before the army’s retreat.
Defeat exposed the retreating soldiers to pursuit. Yamagata Masakage and Baba Nobuharu were among the senior commanders killed; Katsuyori escaped toward Shinano. The losses included men who had served through Shingen’s campaigns as well as ordinary troops.
Historical disagreement · Three thousand guns in three rotating ranks?
The familiar three-rank reconstruction gives Nagashino a precise drill and gun total. The University of Tokyo Historiographical Institute’s research project treats that reconstruction as contested, comparing documentary, narrative and visual evidence. Gyūichi’s account does not by itself establish the scene of three perfectly rotating ranks; its gun numbers also vary with the operation described.
Concentrated gunfire and prepared defenses are better supported than this exact firing sequence. The Takeda included foot soldiers and gunners as well as mounted men, and the castle-relief operation cannot be reduced to cavalry meeting volleys.
Gyūichi's terrain description places the main armies between wooded heights and waterways. It says the allies used depressions to conceal parts of their deployment and placed barriers in front of particular positions. This preparation limited the approaches by which attacking units could reach the defenders. The guns worked within that arrangement, rather than independently supplying protection, ammunition or command. A modern reconstruction of a complete threefold line is more exact than this account alone establishes.
The separate relief detachment gives the operation another direction. Crossing the river and moving through the southern hills brought Sakai's troops behind the forts overlooking the castle. The attack joined the defenders to fresh troops and burned siege positions, while the main armies fought farther west. Gyūichi's successive Takeda contingents are a narrative of repeated attacks and withdrawals, not a roster proving an identical mounted charge by every unit.
The loss of veterans included Naitō Masatoyo, whose biography identifies him as a commander associated with Minowa in Kōzuke and with baggage administration. Such responsibilities show that a senior retainer supplied more than fighting strength on one day. His death belonged to the loss of men carrying command and domain experience. The exact internal consequences for each surviving household still require separate evidence, rather than being inferred from the casualty list.
The allied operation relieved Nagashino Castle and forced the Takeda army to withdraw. Breaking the siege positions restored contact with the defenders, while victory on the main front prevented Katsuyori from holding the relief force in place.
The Takeda lost experienced commanders and many soldiers. Surviving sources differ on totals, and a precise modern casualty count cannot be reconstructed from their celebratory or military narratives alone.
Ieyasu followed the victory with operations in Suruga. Oda forces also moved against Takeda-held Iwamura. Takatenjin remained in Takeda hands, showing that important contested positions still required later campaigns.
Katsuyori retained a functioning domain after 1575. Its destruction in 1582 followed further fighting, territorial pressure and defections. Nagashino removed men and positions that had supported Takeda campaigning, but the intervening chronology matters to explaining the house’s end.
The operations after the victory show both opportunity and cost. Gyūichi records Ieyasu's incursion into Suruga and the burning of settlements there, while Oda forces turned toward Iwamura. These were further campaigns, involving people and positions beyond the first battlefield. Takatenjin's continued Takeda occupation makes the same point from the other side: the defeat did not deliver every contested castle to the victors.
Nor did the disappearance of experienced officers instantly erase their houses or all administrative relationships. The death of commanders reduced available experience and required new arrangements, but the surviving domain continued to hold land and mobilize forces. Later military pressure and defections have to explain the 1582 destruction in their own sequence. Nagashino supplied a substantial loss within that history, rather than a complete account of the seven years that followed.
The operation joined several military tasks: a garrison held, allies concentrated, a night detachment broke siege forts and the main army fought behind prepared defenses. The success of each affected the others. The castle’s relief cannot be explained by gunfire on the main front alone.
The loss of senior Takeda retainers reduced the pool of experienced commanders available for subsequent campaigns. Tokugawa and Oda forces could press contested territory after the retreat, though neither acquired every Takeda position at once.
Later narratives and images made rotating volleys against cavalry the battle’s defining scene. That picture compressed a geographically dispersed operation into one encounter. The surviving account gives more space to troop movement, named units and the separate siege-fort attack.
The castle ruins, battlefield and reconstructed palisades preserve different parts of this history. Modern reconstructions help locate the defensive line; they do not certify an exact sixteenth-century firing formation. Keeping the operation’s distinct locations in view restores the role of the defenders and the relief detachment.
The technological legend also has a history of transmission. The Shiga prefectural library explains that Oze Hōan's augmented biography circulated more widely than Gyūichi's manuscript and strongly shaped such familiar episodes as the three-stage firing scene. That account of readership should not be confused with proof of an exact 1575 drill. Later biographies, images and military interpretations contributed different layers to the scene.
The local museum lists a copy of the battle screen, excavated gunshot and a battlefield model as different kinds of material. A screen composes a scene; a projectile establishes a material trace; a model arranges locations for explanation. None alone supplies every participant's movement or the timing of volleys. These distinctions also matter in comparisons with other gunpowder battles: Nagashino demonstrates an effective deployment under particular geographic and command conditions, rather than a universal passage from traditional to modern war.